How to Use Digital Templates
Published: January 24, 2023
One of the best things about digital planning is it’s flexibility. Customizing your planner can be quick and painless by using digital templates. Here’s a quick look at why templates are great and how to use them.
WHY USE TEMPLATES
A digital template is a page layout pre-designed with a specific purpose. Just copy/paste the template into a page of your planner and you have a functional page in just a few seconds! It’s great for changing the function of a page, even on one that already has a hyperlinked navigation to it. For example, if a page currently has a basic weekly spread but you’d prefer a timetable for the week, you can add a template over the base layout.
Because I like to keep my planners simple (just an annual calendar, months, weeks, space for daily tasks, and a few notebook sections), templates also allow me to pick and choose what pages to include as I need them. It means that my planner isn’t full of pages I won’t use, which makes navigating much easier.
WHERE TO FIND TEMPLATES
Here’s a list of useful templates that are included with our planner:
Monthly/Quarterly reviews and overviews
Various weekly and daily layouts
Routine planners
Meal planner
Wellness tracker
Project planner
Notebook pages
When you purchase digital planners, many come pre-bundled with insertable digital templates in the form of PDFs, PNGs, or JPGs. The digital planner we sell includes over 20!
You can also search marketplaces like Etsy specifically for digital templates. I find the most success when using keywords like “digital planner,” “insert,” and “template.”
Printable PDF’s also make great digital planner inserts. It just requires a little more work to use. You will have to save each page, if there’s more than one, individually in PDF or JPG format to create your digital templates. Check out Pinterest for some free options, we have a board full of them here. You can also find some on Etsy.
TEMPLATE TYPES
There are 2 types of template inserts.
TEMPLATE STICKERS
Templates that are meant to be added like a sticker to a page formatted as PDF, PNG, or JPG. (Digital stickers are PNGs or JPGs.)
You can learn how to add stickers with our tutorial here.
A QUICK NOTE ON PDFs vs PNG/JPGs
PDFs scale way better but can only be used as stickers in GoodNotes, not Notability.
PNGs/JPGs can be cropped via the Image tool. PDFs in GoodNotes cannot.
TEMPLATE PAGES
Templates that are meant to be added as a new page in the digital planner.
There are 3 ways to import templates into your notebook. (Image + Text box - text box includes minimal instructions) huh???
1. USE THE ADD PAGE ICON
From Add Page, select Before, After, or Last Page depending on where you want the template to be inserted. Then select Import. In the pop-up window , navigate and tap on the page you want to add.
2. 4 SQUARE ICON
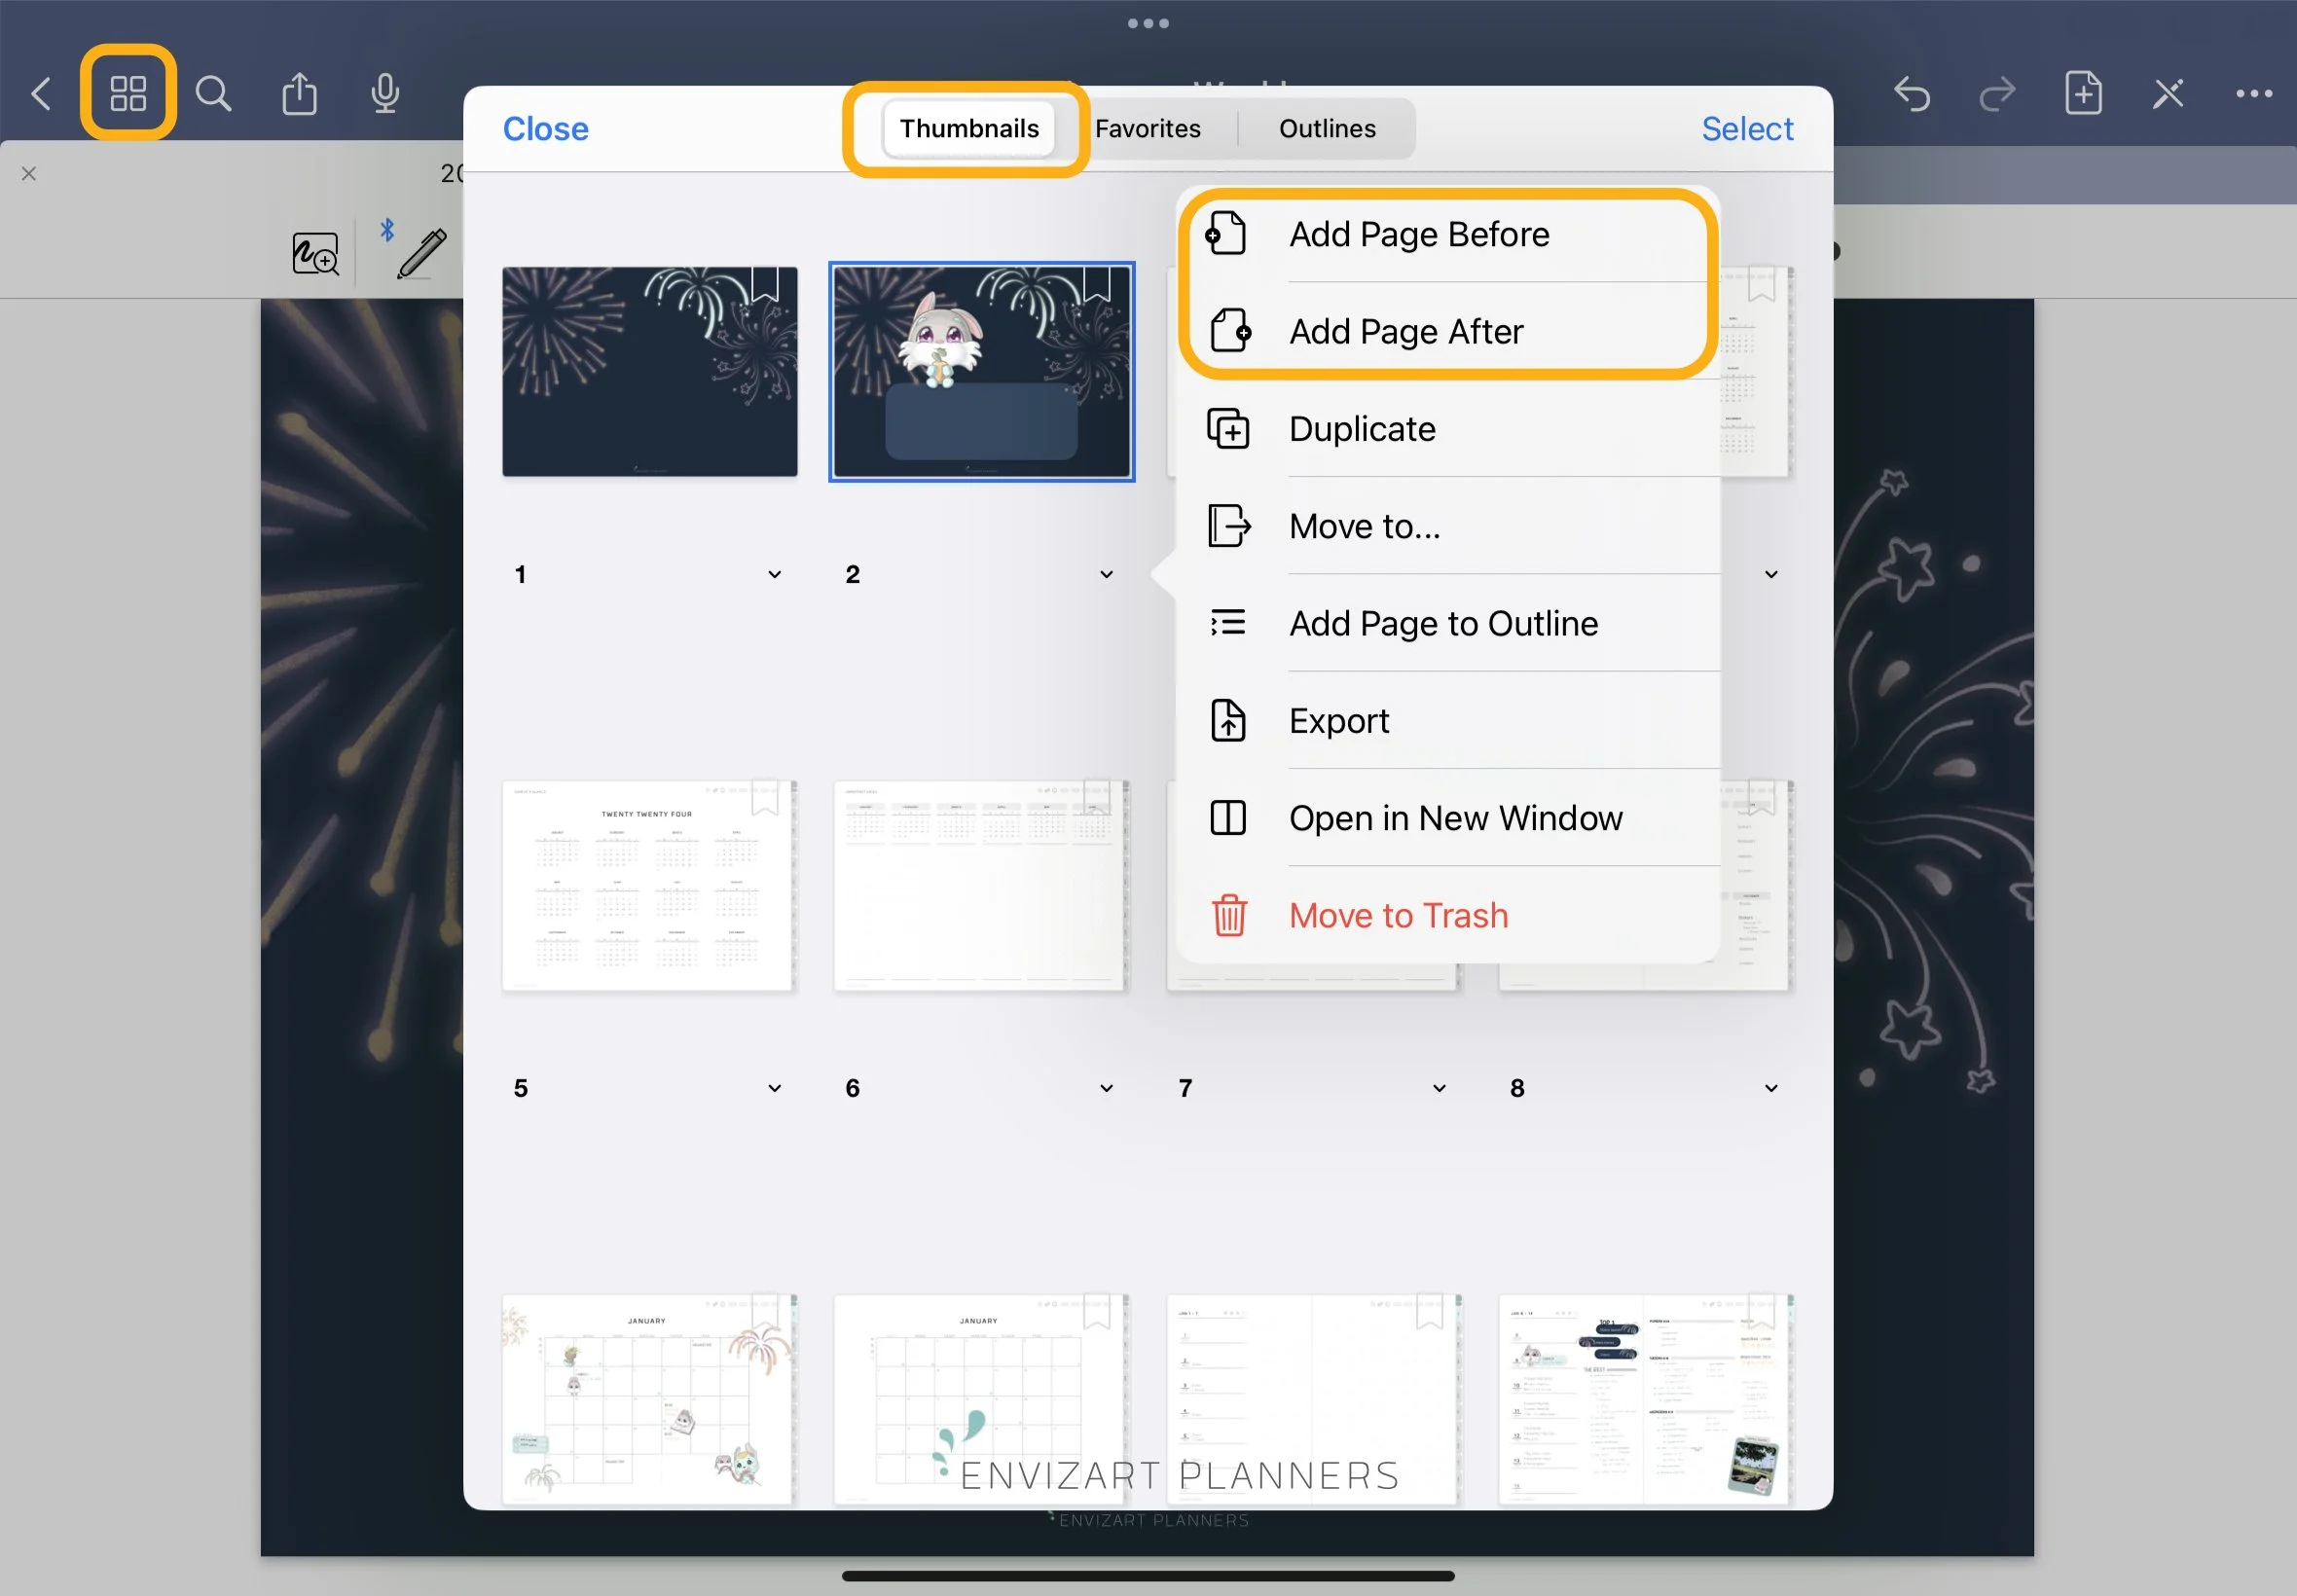
From the 4-square menu, select “Thumbnails,” then navigate to the page right before where you want to add the template. Below the page preview, tap the down arrow. Select “Add Page After,” then Import. In the pop-up window, navigate to the file you want to add. Select it then tap on “Open.”
3. VIA THE FILES APP
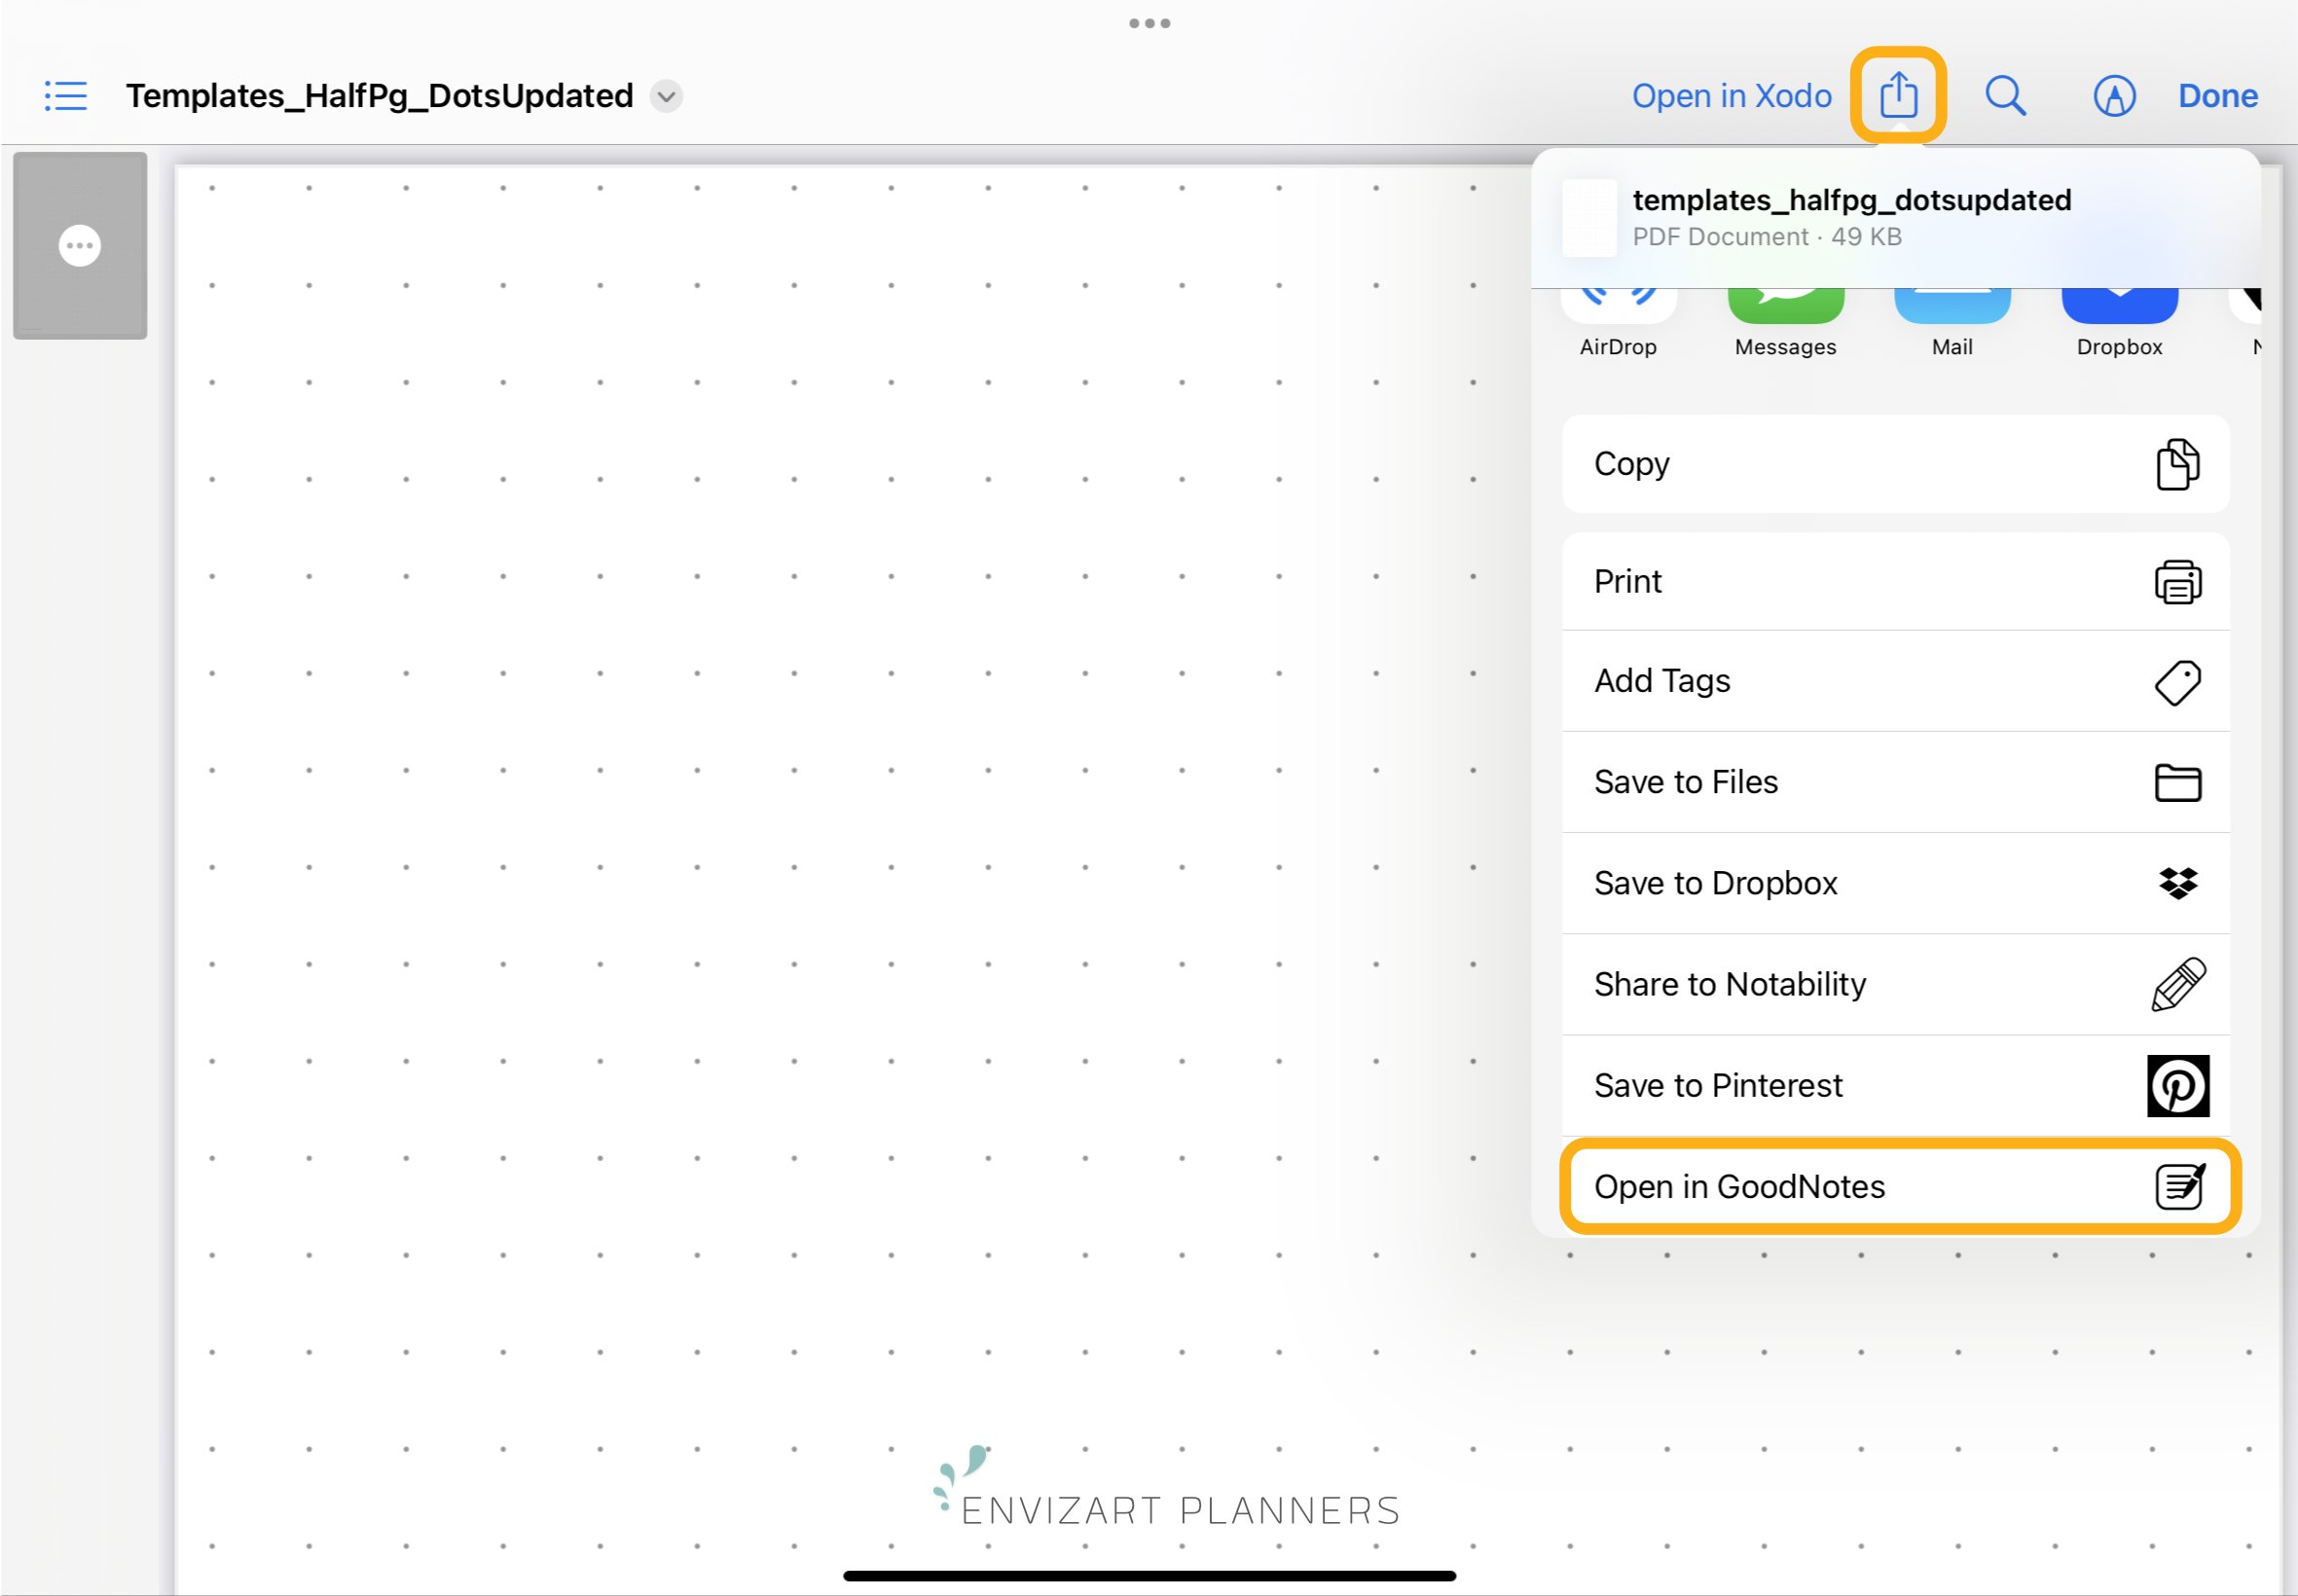
From the Files app, tap on the page you want to add. Then tap on the export button and select “Open in GoodNotes.” It will open the GoodNotes app. Double check to make sure you’re in the right planner (or notebook). Navigate to the page BEFORE where you want to add the template. Then, in the window that appears, select “Import to Current Document.” The template will be added as the next page in the document.
Templates that come with our planner are meant to be used as stickers. I prefer this method because it preserves hyperlink navigation. Stickers are meant to be pasted over current pages that already have hyperlinks to them, whereas template pages are actually inserted as new pages which obviously do not have any attached hyperlinks. Add enough template pages and moving around your planner becomes more difficult
One major advantage of adding a template page is that you won’t accidentally move the whole template when trying to move other elements on the page. There’s give and take with both methods.
TIP: USE THEM AS A BASE
Templates are great for being used as a foundation for your own design. Adjust colors, choose a different font, and add stickers. The sky’s the limit! You can even duplicate pages that you have designed to use as a template later.
(Flowers and shiba inu from our Spring Digital Sticker set. Find it in our shop here.)
BONUS TIP
Widgets can also be used to create your own templates! We’ll have another post about that soon.
PIN IT FOR LATER
YOU MIGHT ALSO LIKE
Fun winter and New Year planner design ideas bullet journal style. From cold to warm and a little New Years sparkle; check out this post for some ideas, font suggestions, color tips, and FREE DIGITAL STICKERS!
Want your digital planners to look handwritten, but your penmanship looks more like illegible scribbles? (Or is it just me…) Try installing custom fonts! This post will help you get started.
Have you ever wished you could flip a digital sticker in GoodNotes or Notability? Here’s a couple of ways to do just that.


